 Learning CenterGet Started with Your GemLightbox Mini · GemIQ Learn
Learning CenterSetupGet Started with Your GemLightbox Mini
Set up your GemLightbox Mini, connect it to GemIQ, and capture your first jewellery photo or 360° video. No photography experience required.
3 min read·
This guide will walk you through the basics of setting up your GemLightbox Mini and getting ready for your first capture.
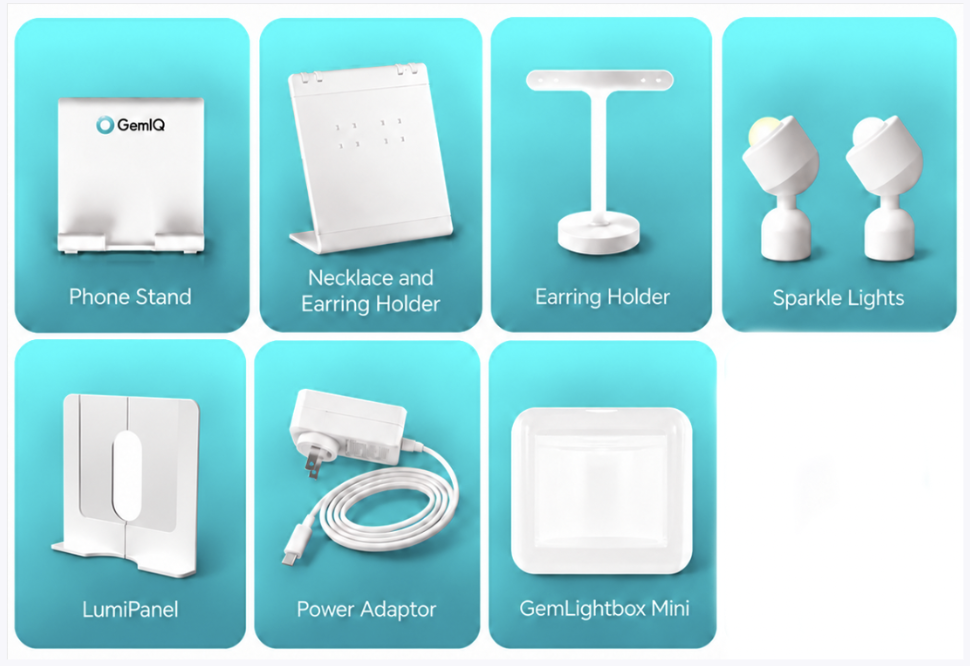
What’s in the Box
Your GemLightbox Mini comes with the essentials you need to start creating jewellery content:
Download the GemIQ App
Install the GemIQ app before powering on — your hardware will appear there as soon as it’s ready to connect.
Power On Your GemLightbox Mini
Connect the power cable to your GemLightbox Mini.
Connect the other end to a suitable power source.
Switch on the GemLightbox Mini.
Your Mini is now ready to connect to GemIQ.
Connect Your Mini to GemIQ
Open the GemIQ app.
Go to Camera.
Tap Not Connected / Connect Device.
Select GemLightbox Mini.
Wait for the connection to complete.
The Max guide uses the same simple Bluetooth-first connection flow, so I would keep this section equally short for Mini.
Set Up Your Phone
Place your phone on the included phone stand and position the camera in front of the GemLightbox Mini.
Check the camera preview in GemIQ and adjust the phone position until your jewellery is framed the way you want.
Position Your Jewellery
Place your jewellery in the centre of the turntable.
Depending on the piece, you can:
Place rings and other suitable pieces directly on the turntable
Use the magnetic holder for necklaces and earrings
Use the earring stand to position earrings neatly
Keeping the jewellery centred will also help create a smoother 360° rotation.
Set Up Your Lighting
GemLightbox Mini includes additional lighting accessories to help you adjust the appearance of your jewellery.
LumiPanels
Position the LumiPanels to control reflections and achieve even lighting across your jewelry.
Magnetic Sparkle Lights
1 white Sparkle Light
1 yellow Sparkle Light
Attach and position them depending on the jewellery you are photographing and the look you want to achieve.
Try different lighting positions while checking the live preview in GemIQ.
Capture Your First Photo
Once your jewellery is positioned:
Check the jewellery in the GemIQ camera preview.
Adjust the jewellery, phone or lighting if needed.
Select your preferred scene or capture settings.
Tap Capture.
Review your photo in GemIQ.
Capture a 360° Video
To create a rotating jewellery video:
Position your jewellery in the centre of the turntable.
Make sure the piece is secure.
Select the video capture option in GemIQ.
Start recording.
Allow the turntable to complete its rotation.
Review your video in GemIQ.
If the jewellery appears to move from side to side during the video, check that it is positioned as close to the centre of the turntable as possible.
Optional: GemLightbox Mini Eclipse
The GemLightbox Mini Eclipse is an optional accessory that allows you to create jewellery photos and videos on a black background.
For full instructions, see How to Set Up the GemLightbox Mini Eclipse.
Next Steps
Now that your Mini is connected and ready:
Try capturing different types of jewellery
Capture both photos and 360° videos
Review and edit your content in GemIQ
Explore GemStudio for additional content creation tools
The Max guide ends with a similarly short “Next Steps” section rather than trying to teach every GemIQ feature in the getting-started article.
Common Questions
How do I connect my GemLightbox Mini to GemIQ?
Make sure Bluetooth is enabled on your phone. Open GemIQ, go to Camera → Connect Device, and select your GemLightbox Mini.
How do I start a 360° rotation?
Position your jewellery in the centre of the turntable and start the video capture from GemIQ.
Is the GemLightbox Mini Eclipse included?
The Mini Eclipse is an optional accessory and is used when you want to create jewellery content on a black background.
Need Help?
If you need assistance setting up your GemLightbox Mini, contact the GemIQ Support Team or book a 1:1 onboarding session.
Was this article helpful?